The James Gang

H.A.F.

a.k.a. Rusty Nails
Let us know how it was when you land.
I was NOT ready for the first hit. DAMN. I was able to slowly exhale before coughing my ass off so it wasn't painful ;)

I stuck it in a metal doob-toob to put it out and recuperate, then went back for seconds. Easy to relight and burned perfectly even which surprised me. Took two separate sessions to get through the oily part, and I was satisfactorily stoned but not incapacitated.

Next I need to try it and see if it burns smooth without letting it dry out. I think once you roll it in the kief that probably makes it fine. You can see it going full melt as you puff if you can cross your eyes :ROFLMAO:

I'm getting so I like the 'ritual' of pulling out a bud and getting it smokable start to finish instead of going into mass production mode. If I can oil it up and pack it then smoke it as part of the same process that would be acceptable. If not I may have to do the assembly line thing just to get cones ready to dry.
 

NoWaistedSpace

I'm Hoarding Skunk
2 days ago all the veg plants got a little (1qt) of aloe fermented plant juice, powdered aloe, and some LAB and molasses. They liked it.
View attachment 96314
The 007up (front right) is thriving now, so I'm moving some that I know won't flip with the rest back in here.
View attachment 96315
And these are mostly rooted where it's obvious in the clear cup. They got their first good watering with coconut water, which should stick the soil together well for an up-pot in a few days. I usually see a growth spurt after the first soak. View attachment 96316
Glad to see someone covering up their soil medium.
Anything is better than nothing on top.
 

H.A.F.

a.k.a. Rusty Nails
Old dude growing. Busy night ahead so I took a nap. Getting coffee and a podcast lined up to get started. This will infolve sorting the worm bin and figuring out how to best fit two plants in one pot. Here's the dry-fit to see if pot size works/fits, if I have enough soil, etc.

IMG_5501.JPG
The smaller Freakshow is still androgenous so that's basically a plant stand. I may add extra soil to raise it after I pot the rest.
First up-pot with a covercrop already established (just the 2-top Freakshow)
 

H.A.F.

a.k.a. Rusty Nails
The last Freak showed me a pistil. So from what appeared to be a shit drop I have two PTK, 2 Freakshow, 2 Royal Kush and a Royal Limez.
The RK are two phenos, and the Freaks are at least two different structures. Not sure how pheno's would work there... :unsure: the PTK are very similar.
IMG_5505 (2).JPG
I would like to have all of one drop fit in one tent and the other be finishing up. Technically I did, since I could squeeze the limez in here, but fuck clones. I have ten years worth of beans to drop at a minimum. I'll be rearranging, as stuff stretches, and I have a smallet tray on the way for the big pot so I can squeeze stuff together more.

I could just set them on the floor, but I have a grid under each of them for drainage/airflow and that would rip the tent moving them around. So trays...
 

H.A.F.

a.k.a. Rusty Nails
So healthy they look fake
They may end up in full organic, but for now they are mostly my old-style with generally organic stuff in my old soil. They got worm castings when they went from cups to pots, then yesterday they got a teaspoon of FF Jump Start top dressing. They really like that, but I am wanting to get away from imported shit (bat, chicken, fish, etc) and stick to what the worms shit.
 

H.A.F.

a.k.a. Rusty Nails
They're just past one month so I'll be looking at topping soon - then they get ugly again.

I think one of the best things I have done is thrown out the calendar as far as the plantgrowth goes. Not keeping track of weeks and days. I have the drop and flip dates in my signature block if I want to do the math. Basically letting them do their thing. They look like plants now and are getting sprouts. Next is topping and another up-pot, not necessarily in that order.
 

H.A.F.

a.k.a. Rusty Nails
IMG_5509.JPG
60 gallon pot, and the other half of the build a soil is mixed, soaked and covered. About 35gal. Pulled the straw aside to show the dirt level.

Here's my thinking.

I have the babies to up-pot sooner than this is ready, but just into the "2-gallon short" pots - basically a little 5qt bucket with no handle and holes in the bottom as far as size goes. That should be the last of my old soil I have to use.

The first half batch filled the pots in the one tent, plus the Royal Limez in the other tent. The short version is that the kit makes enough soil to fill both tents. In general, I don't think it was a bad $300 investment. And it will gradually gain volume as I add compost and such.

I am cycling out my old soil, but it's all getting re-ammended and cooked until next tomato season. I'm liking the big-pot-with-living-soil idea for outside. And I have plenty of good local worm castings in the forest to help fill them.
 

H.A.F.

a.k.a. Rusty Nails
One other thing I am doing is recycling every bit of the plant back into the soil via the worms. I have a big net drying rack in a closet and have been chopping up everything and letting it get crispy-dry. The best worm beds outside are under dead logs - wood is good. The fat stems and trunks should get some of that woody goodness in their diet and overall reduce the amount of paper I need to add.
IMG_5510.JPG
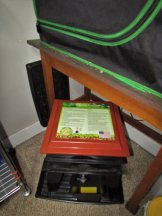
If anyone feels hesitant about trying a worm bin, dive in. This is all the room it takes up, under my mini tent. There is no smell. If there is you have problem to deal with just like anything else, but I haven't had that happen. There is an issue of a few escapees dying on the carpet...

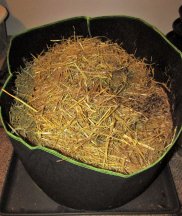
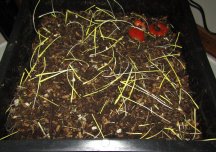
This top level I have a piece of cardboard over that I keep moist. I add soil to the initial bedding, and obviously some barley found it's way to sprouting. They love it. And the stuff is growing in the dark. I bought a large supply of coir, which is the only investment other than the bin. The starting bedding is about half and half dry paper and soaked-drained coco, with a handfull of soil which has nutrients in it and a handfull of pumice . I have another tray ready to set on top today, those tomato scraps are the first food I added to this tray. I did that because I saw the worms migrating up to this level
IMG_5511.JPG
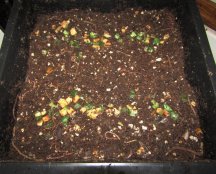
I think they like the coir as much as the food, but it keeps me from under-feeding. This is the last food I am adding to the lower level. Great variety of local wigglers. In the mornings I'll go out and burn one, and scratch the dirt under a few trees. There are mostly fat earthworms, and whatever those skinny snake-y ones are. They try to escape like a snake when you uncover them and are easy to spot. I think their initial offerings to the compost add a shot of the local microbes and critters, because the castings are crawling with itty-bitty-critters and worm eggs.
IMG_5512.JPG
This has a few more trays, but I don't know if I'll use that many the way I cycle through plants. The last re-pot I grabbed a solo-cup per plant, worms and all from the bottom bin. That is why the level on it ias about half. I just raked it back level and set the other tray on it. After that I got under the bottom dray and scraped out all the actual 100% castings and the little worms down there and divided that equally between the pots.

Anyway, it seems worth the investment like the soil so I'm sharing - And per the moniker High as Fuck from trying a wake-n-bake with GMO Cake. I'm going to hunt worms :ROFLMAO: 🤷‍♂️

Oh, I'm rural and have to haul my trash to the dump. I have to make fewer trips since I'm paying attention to not throwing away worm food. If it's more than the inside ones can eat I have spots outside I dump it, then hunt for worms to bring inside.
 

H.A.F.

a.k.a. Rusty Nails
Oh - my point was :rolleyes: I am using three trays maximum. I keep adding worms on a regular basis, and they breed. I have a spare 4th tray but I don't see using it. Nice to have but you wouldn't need to buy a larger model or a spare tray for a small operation like I have.

But there's a bottom tray that is soil ready compost, a middle tray that is a feeding tray that starts with the new bedding, and as soon as I start that as a feeding tray I add another on top with raw bedding.

I add food and worms to the middle tray. When the lower one looks done and I haven't needed it in a pot, I'll sift it for castings then add the worms and big stuff to the new lower tray.

I keep the castings in a bucket with a loose lid, and a piece of garbage bag on top that I keep moist. That stuff is alive, and I think adding those when I go from solo-cups to small pots will get that worm life started in the pots earlier.
 

H.A.F.

a.k.a. Rusty Nails
:rolleyes: Oh - and when I add a new upper tray with fairly dry bedding I move the cardboard up. That way the worms can escape to the upper bedding if it gets too moist. Just a safety factor. Maintaining the right moisture level is good, but it rises. As long as the cardboard or paper bag on top stays moist is's all good. It should dry out and need to be sprayed occasionally. The worms make moisture so I never add it to the lower trays.
 
Top