
HydroRed's DIY Budget Flood and Drain (approx $40 total)
BigBallzWillie
BE THE BALL
What is the size of the tub? L x W
Hydro
PICK YOUR OWN
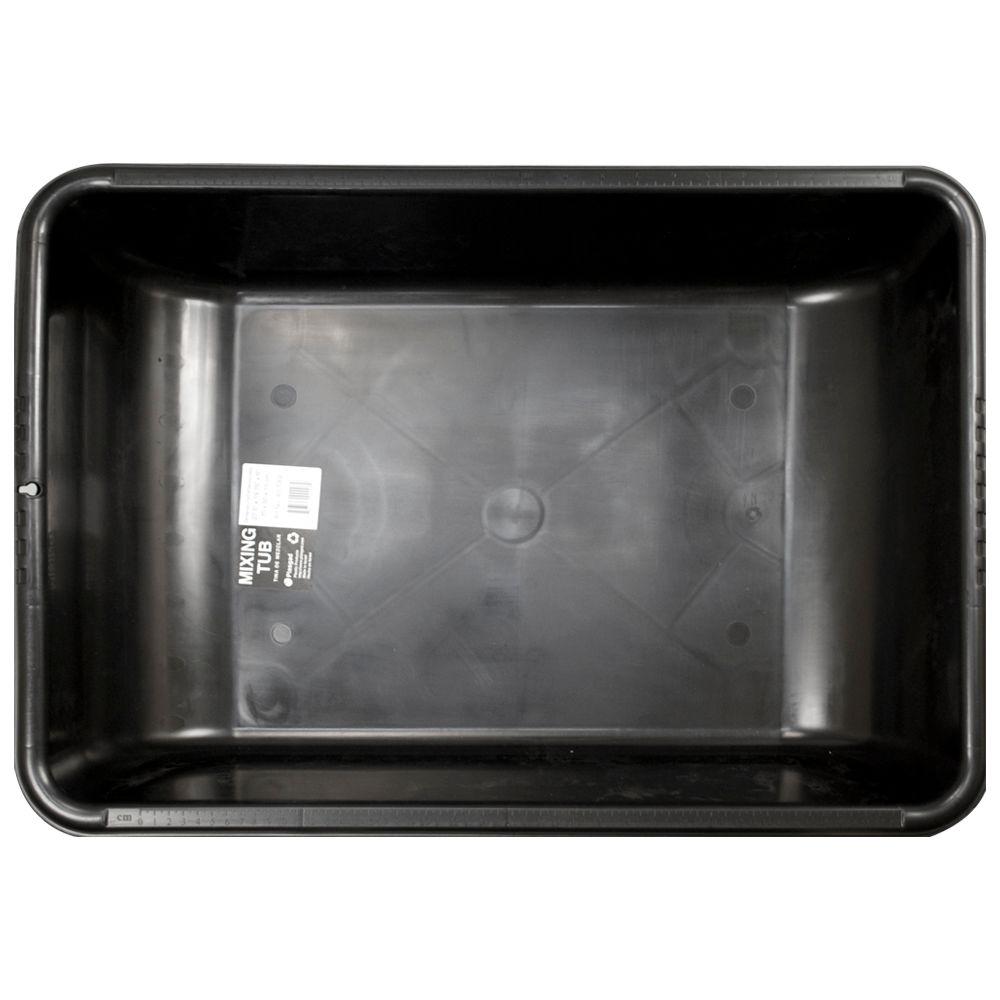
The "good" tub size is 27 1/2" x 19 3/4". More than one tub fits the top of the 27gal tote, but the Sceptor brand ones are an absolute perfect fit. The others from Home deepoe dont fit nice into the top of the 27gal tote, they are about 1/4" too big both L x W. It wants to sit up off the tote as where the Sceptor brand fits down and stays down into the tote nice and flush. No gaps/light leaks etc.What is the size of the tub? L x W
BigBallzWillie
BE THE BALL
I had a link showing some of Sceptors other names, then I lost it, lol.
At TSC it's called tuff-stuff and I believe that this is the same tub...but pricey. There were definitely other "names" that they manufacture under.
 www.tractorsupply.com
Harbor Freight has a 7 gallon but looks to be smaller.
At TSC it's called tuff-stuff and I believe that this is the same tub...but pricey. There were definitely other "names" that they manufacture under.
Tuff Stuff Products Small All Purpose Mixing Tub, 11 gal. / 1.5 cu. ft. at Tractor Supply Co.
Find Tuff Stuff Products Small All Purpose Mixing Tub, 11 gal. / 1.5 cu. ft. in the Buckets, Pails & Tubs category at Tractor Supply Co.Tuff Stu
Harbor Freight has a 7 gallon but looks to be smaller.
TerpyTyrone
LED Recruiter
I am seriously thinking about incorporating this into my next build. Why not, coco is cheap, thw system is cheap and I have half the parts laying around.
In my first go round I left for a week and tried to use a sump pump on a digital timer set at 2 minute increments twice a day but it backfired , clogged from the silica and was a bad overall design. I tried to use spray nozzles instead of a halo around it using tees.
Anyway i want to come Up with a non hydro system,that I can be auto and only visit it once a week
Hydro
PICK YOUR OWN
I actually believe the ones I use from Low's home improvement are 7 gal. I'll have to check out the ones at HF though and see the dimensions. For the 27 gal tote, youre gonna want to use the smaller size tub. The one in your link is the larger one (11 gal) .I had a link showing some of Sceptors other names, then I lost it, lol.
At TSC it's called tuff-stuff and I believe that this is the same tub...but pricey. There were definitely other "names" that they manufacture under.
Tuff Stuff Products Small All Purpose Mixing Tub, 11 gal. / 1.5 cu. ft. at Tractor Supply Co.
Find Tuff Stuff Products Small All Purpose Mixing Tub, 11 gal. / 1.5 cu. ft. in the Buckets, Pails & Tubs category at Tractor Supply Co.Tuff Stu
Harbor Freight has a 7 gallon but looks to be smaller.
Hydro
PICK YOUR OWN
With a large enough res, you can easily do that with F&D. Just with my little 27 gal tote design I left the state for 6 days and came back to a lush lovely garden. Like I never left. I use on average about 1 gal needed per day in top off when my plants are at their peak thirst. I only use 10 gal or so to flood the tray and still have enough in the res to keep the pump submerged. Anything more than those 10 gal is just additional days you have to "step away" from the system.I am seriously thinking about incorporating this into my next build. Why not, coco is cheap, thw system is cheap and I have half the parts laying around.
In my first go round I left for a week and tried to use a sump pump on a digital timer set at 2 minute increments twice a day but it backfired , clogged from the silica and was a bad overall design. I tried to use spray nozzles instead of a halo around it using tees.
Anyway i want to come Up with a non hydro system,that I can be auto and only visit it once a week
BigBallzWillie
BE THE BALL
These are the measurements 28 in. x 20 in. x 6 in. they are the same. TSC is already using some alias manufacturing name, who's to say thay are any more honest about the description? Even if they call it 11 gallon, it's the same measurements.I actually believe the ones I use from Low's home improvement are 7 gal. I'll have to check out the ones at HF though and see the dimensions. For the 27 gal tote, youre gonna want to use the smaller size tub. The one in your link is the larger one (11 gal) .
Looks like an order item, it would nice to be sure.
Cob_nUt
"Justa Ganja Lover"
Red Home depo has a new mixing tray brand called plasgard.Im going to check them out tomorrow to see if they fit their xxl commander brand of totes which is called hdx.
Dimensions are kinda tight but they may fit righteously.
Plasgad Black Medium Concrete Mixing Tub-887101C - The Home Depot
This multi-purpose Medium Concrete Mixing Tub features a heavy-duty PVC material. The material allows it to withstand mixing of heavy materials such as concrete, grout or mortar for masonry. It has a
www.homedepot.com
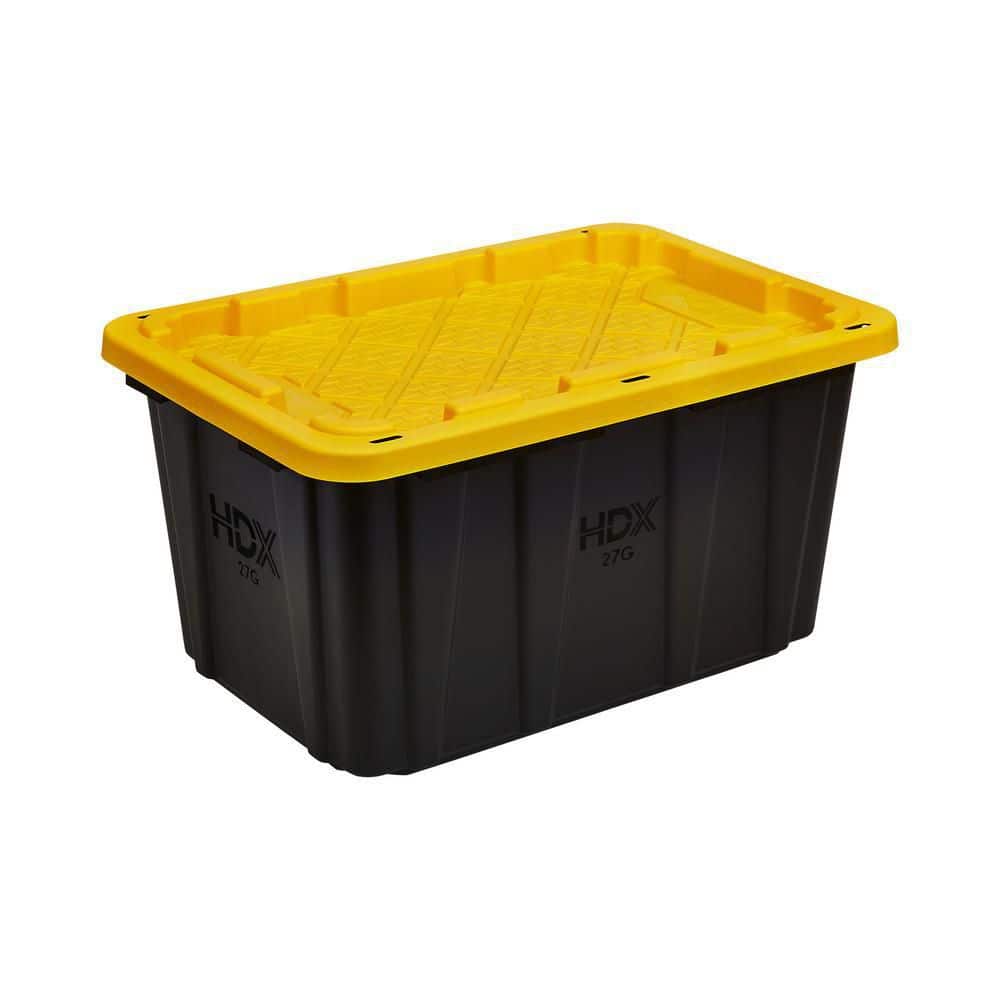
HDX 27 Gal. Tough Storage Tote in Black and Yellow 999-27G-HDX - The Home Depot
This heavy-duty HDX 27-Gallon Tough Tote is designed to handle all your storage needs. The recessed lid enables you to stack multiple units effortlessly, while the tapered design facilitates easy nesting
www.homedepot.com
Dimensions are kinda tight but they may fit righteously.
Hydro
PICK YOUR OWN
I already tried em and unfortunately they are a bit too big and dont set down in either one of the 27 gal totes (HDX or Commander XXL) all the way.Red Home depo has a new mixing tray brand called plasgard.Im going to check them out tomorrow to see if they fit their xxl commander brand of totes which is called hdx.
Plasgad Black Medium Concrete Mixing Tub-887101C - The Home Depot
This multi-purpose Medium Concrete Mixing Tub features a heavy-duty PVC material. The material allows it to withstand mixing of heavy materials such as concrete, grout or mortar for masonry. It has awww.homedepot.comHDX 27 Gal. Tough Storage Tote in Black and Yellow 999-27G-HDX - The Home Depot
This heavy-duty HDX 27-Gallon Tough Tote is designed to handle all your storage needs. The recessed lid enables you to stack multiple units effortlessly, while the tapered design facilitates easy nestingwww.homedepot.com
Dimensions are kinda tight but they may fit righteously.

PhatNuggz
Active Member
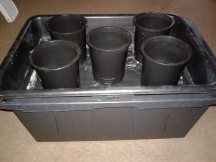
Im missing something here, maybe a couple more pictures would clear it up: The way this will work, is that the tray sits inside the top of the res, leaving space under the tray in the res to hold the water. The F&D kits gets installed into the tray any way you choose to do so that it fits your needs and pot count in the tray. The submersible pump sits under the tray in the tote (reservoir) and the 1/2" tubing connects the pump to the fill side of the F&D kit.
BigBallzWillie
BE THE BALL
Ok, thinking out loud...
Red, you are only using that yellow top if the res is under the table right? That layout would increase the res by 10 gallons or so. Is that "under the table" setup better or worse in terms of performance against just dropping the bin in?
If the tray is a bit smaller than the tote, it could be cut into the yellow top..yes, maybe?
and / or
A rubbermaid or other tote. Like a 17 gallon with lid on, then a 10 gallon on top might work. just cut two holes in lid for the pipes to go through.
I'd like to put this in a 3x3 tent.
Hydro
PICK YOUR OWN
The tray sets in top of the 27 gallon tote. The space between the bottom of the tray and the bottom of the 27 gal tote works as the reservoir. The 2 holes in the tray are where I decided to put my F&D bulkhead locations. The submersible pump sits in the bottom of the res and is connected to the fill bulkhead by a 1/2" tubing. The drain bulkhead is left with no tubing since it will just flow right down into the res without any tubing since the tray is right over top of the 27 gal tote (reservoir).Im missing something here, maybe a couple more pictures would clear it up: The way this will work, is that the tray sits inside the top of the res, leaving space under the tray in the res to hold the water. The F&D kits gets installed into the tray any way you choose to do so that it fits your needs and pot count in the tray. The submersible pump sits under the tray in the tote (reservoir) and the 1/2" tubing connects the pump to the fill side of the F&D kit.

Hydro
PICK YOUR OWN
Yes, the amount in the res would be able to be increased without the tray in the tote. 10 gal in the res is enough to flood the tray and keep the waterline above the pump in the res. Anything more than that is just more time you can have without needing to top off or babysit the res (leave the system alone for days at a time with no worries). Either of those examples you said will work. Ive experienced no difference between running with the tray in res, or the res being seperated under a table with the yellow lid on.Ok, thinking out loud...
Red, you are only using that yellow top if the res is under the table right? That layout would increase the res by 10 gallons or so. Is that "under the table" setup better or worse in terms of performance against just dropping the bin in?
If the tray is a bit smaller than the tote, it could be cut into the yellow top..yes, maybe?
and / or
A rubbermaid or other tote. Like a 17 gallon with lid on, then a 10 gallon on top might work. just cut two holes in lid for the pipes to go through.
I'd like to put this in a 3x3 tent.
gwheels
Hobby Farmer
Now i get it Hydrored...that last pic did it.
I need a bin that sits perfectly in the tote OR a closed tote that pumps and can drain into the tote (with a planter lid with the fill and drain things).
EuReKa !!!
I need to make this now i popped too many beans...and i have a few square feet i can squeeze it in
I am getting the tube and pump this weekend. I have heisenbeans that NEEDS it. Or I must taste them so I NEEDS it.
Texagonian
Outlaw
Hydro
PICK YOUR OWN
No stone in the res since the waterfall action on the drain side works to keep everything oxygenated. I use the cheap 3% from the drugstore at 89 cents a bottle, usually buy 2 get 1 free as well. I dont measure anymore when I add the H2o2 but I'd guess about 15 ml per gallon or so and I'll re-add every 3-4 days.Quick question @HydroRed , I believe I read that you run a sterile system and are using h2o2 to achieve that. The question is how much peroxide to gallon(s) of nutrient/water and what % is said h2o2? Also, do you run an air stone in your res?
Texagonian
Outlaw
Hell yea, thanks for sharing! Probably wouldn’t hurt if a person wanted to bubble the res. Good to know it’s not absolutely necessary though 


Greenthumbskunk
PICK YOUR OWN
This is an easy and affordable DIY Flood and Drain build. Anyone who knows me knows I like to do stuff on the cheap and this project is no different. This can be used either with the tray in the tote, or tray on a table and the tote as the reservoir.
PARTS NEEDED:
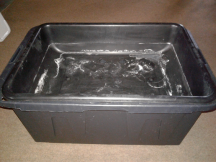
(1) "ODJOB" brand 7 gal mixing tray ($5.98 @ Lowes)
View attachment 675
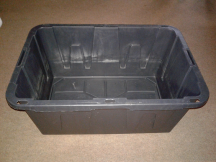
(1) "Commander XXL" brand 27 gal tote ($8.99 @ Lowes)
View attachment 674
(1) 1/2" Fill - 3/4" Drain F&D bulkhead set ($8.99 @hydrostore or online)
View attachment 676
(1) 185 gph submersible pump ($12.49 at hydro shop or online)
View attachment 677
(2') 1/2" O.D. plastic tubing ($0.89 per ft at hydrostore or Lowes)
View attachment 678
The way this will work, is that the tray sits inside the top of the res, leaving space under the tray in the res to hold the water. The F&D kits gets installed into the tray any way you choose to do so that it fits your needs and pot count in the tray. The submersible pump sits under the tray in the tote (reservoir) and the 1/2" tubing connects the pump to the fill side of the F&D kit. I have labeled some of the parts by brand name specifically because I know they are an absolute perfect fit when used together. I have built 4 sets of these for myself and many more for others. They have been in use in my rooms for yrs now without any issue or fail so I know they work and am confident it will work just as good for you!
INSTRUCTIONS:
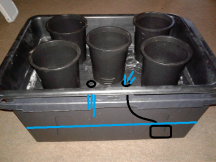
Drill out (2) 1-3/8" holes with a hole saw bit. The location of the holes should be dependent on how many pots you will be using and where you will be placing them. I use up to (6) 1gal pots so I drill mine accordingly but you can run any number of pots that you feel will work for you. Heres a couple examples of placement for your fill and drains with different pot sizes,count, and arrangements. Red represents fill, and green represents drain.
View attachment 682
-Connect the bulkheads onto the tray, sure to use the included rubber washers. No silicone or anything like that should be needed. Just put the screen top on the fill side, and put 1 collar and a screen on the drain side. Be sure you put the right pieces on the right sides or your table wont fill or drain properly. Again, you want just the screen top on the 1/2" fill bulkhead, and the collar AND the screen top on the 3/4" drain bulkhead (as shown).
View attachment 686
-Use the (2') of 1/2" tubing to connect the fill bulkhead on the bottom of the tray to the submersible pump and place the pump in the tote (reservoir).
-Place the tray into the top of the 27 gal tote (reservoir). Be sure there are no kinks in the 1/2" line when you place the tray into the tote. If there is, just cut some of the excess off so the line sets in the res comfortably connected to the submersible pump.
View attachment 687
-No tubing is needed for the drain portion since it will naturally just drain right back into the tote (reservoir) once the desired flood depth is achieved.
-Fill with water. I usually fill with 12 gal as this is enough to flood the tray, and still keep enough in the res so ther pump doesnt run dry or suck air.
-Connect the power cord from the submersible pump to a timer and set it to flood 15 min every 3-4 hrs (or as you feel is needed). This should be a good starting point until you determine the frequency of your floods. Once the timer cuts off, gravity will make the water flow back down to the res through the fill bulkhead and down through the submersible pump.
-Fill the tray with your potted plants in hydroton, adjust your nutrient strength & pH, and get to flooding -YOU'RE DONE!
TIPS:
Make sure the holes in the pots you use arent bigger than the hydroton (or whatever medium you use) or it will spill out during floods and make a mess of your clean flood tray and you'll be constantly picking out medium.
Be sure your tray sits flush down inside of the tote. You dont want any light in your reservoir. This is why I was "brand specific" on the tray and tote.
If you notice your flood level isnt where it once was, or if you notice bubbles coming from the fill while flooding -its time to add to the res.
You can use a sight tube to keep track of where your water level is or you can mark a line on the reservoir as a reference of where the water level should be.
You can use furniture dollies under the tote to make moving them around an easy task.
This same setup can be used on a table simply by getting the appropriate length of 1/2" and 3/4" tubing to run from the tray to pump in the res by drilling holes in the lid for the tubing to run through like shown:
View attachment 1889
Does the Rez need to be chilled? If not do you think growing in a 4x4 in a hot garage in the summer would still be just fine just water more often?
Hydro
PICK YOUR OWN
I've never owned a chiller, but I also use water fall style hydroponics (aquafarm drip rings/F&D) so that helps in regards to being able to run a bit higher temps and oxygenation as well. I also run a sterile res in a climate controlled room. Depending on how hot were talking here, you'll probably be ok if your ambient temps are in the high 80's and your res is sitting on a cool concrete floor which will help keep the res cooler than the environment. Top offs every cpl-few days with really cold water also helps because the water in the res doesnt warm up as fast as it is being used. If your room temps are going to be over 90*F like my garage gets....Id probably pass on the hydroponics and recommend dirt or coco hand fed if you dont want to spend on a chiller or AC.Does the Rez need to be chilled? If not do you think growing in a 4x4 in a hot garage in the summer would still be just fine just water more often?