HydroRed's DIY Budget Flood and Drain (approx $40 total)

Greenthumbskunk

PICK YOUR OWN
I've never owned a chiller, but I also use water fall style hydroponics (aquafarm drip rings/F&D) so that helps in regards to being able to run a bit higher temps and oxygenation as well. I also run a sterile res in a climate controlled room. Depending on how hot were talking here, you'll probably be ok if your ambient temps are in the high 80's and your res is sitting on a cool concrete floor which will help keep the res cooler than the environment. Top offs every cpl-few days with really cold water also helps because the water in the res doesnt warm up as fast as it is being used. If your room temps are going to be over 90*F like my garage gets....Id probably pass on the hydroponics and recommend dirt or coco hand fed if you dont want to spend on a chiller or AC.

Well I run rdwc and have chillers and was wondering if this style let you run in high heat. I have more space elsewhere but the added expenses of building another grow room is not feasible. My garage probably gets well over 110 degrees. 100 degree days and sun beating down on it.
Thanks on your advice.
 

Texagonian

Outlaw
Well I run rdwc and have chillers and was wondering if this style let you run in high heat. I have more space elsewhere but the added expenses of building another grow room is not feasible. My garage probably gets well over 110 degrees. 100 degree days and sun beating down on it.
Thanks on your advice.
I remember those kind of days and the heat that just won’t quit. I still go back home once a year to visit but to come back permanently at this point is out of the question. Stay cool✌🏻
 

Hydro

PICK YOUR OWN
Quick question. how do you drain your reservoir , can you change it out without removing all the plants .
Theres a few ways you can do it depending on how close you are to a drain and how much space you have to work with.

1.)If you are not close to a drain: Leave an extra 24" of 1/2" tubing on the pump so you can disconnect it from the bulkhead and fill up a bucket by turning on the pump manually.

2.)If you are close to a drain: Use the appropriate length of 1/2" hose that reaches from your res to the drain. Connect that to the pump and run the pump manually until empty.

3.) If you have room in your grow area: Use an extra tote (reservoir) exactly the same as the one you are using so you can just place the tray and pump into the clean, ready tote....plants and all in one quick exchange. Then you can move the old res as you wish-when you wish and you never miss a beat. You always have a fresh clean one ready to go. This works well if you have multiple systems that all share the exact same tote (reservoir) size.
 

yendor

Member
Theres a few ways you can do it depending on how close you are to a drain and how much space you have to work with.

1.)If you are not close to a drain: Leave an extra 24" of 1/2" tubing on the pump so you can disconnect it from the bulkhead and fill up a bucket by turning on the pump manually.

2.)If you are close to a drain: Use the appropriate length of 1/2" hose that reaches from your res to the drain. Connect that to the pump and run the pump manually until empty.

3.) If you have room in your grow area: Use an extra tote (reservoir) exactly the same as the one you are using so you can just place the tray and pump into the clean, ready tote....plants and all in one quick exchange. Then you can move the old res as you wish-when you wish and you never miss a beat. You always have a fresh clean one ready to go. This works well if you have multiple systems that all share the exact same tote (reservoir) size.
Thanks for that . Its a great system , its always easy to create something complex and hard to create something simplex .. Relative humidity is always a problem in my part of the world so i am always on the look for some improvements . 60ltr pots of cococoir must hold 30 odd ltrs of water each so that a lot of moisture vapping off compared to your system. where 99% of the water return to the reservoir . i will definitely be incorporating your thoroughly thought out system in to mine in the future cheers.
 

gwheels

Hobby Farmer
Also I had to McGyver that pump...Guess what happens at 400 GPH. It is a 5/8 fitting. So I used an OntarioCannabisStore (OCS) single joint tube and cut it down to jam in the pump and got it into the half inch pipe with gorilla glue and massive strong hands..:D

So my logic was flawed...well if 185GPH costs 17 i can get a 400GPH for 20...But you cant fit it together.

I had some tubes and gorilla tape so the shit works but it was overkill...But maybe not. I think I might run a 4 x 8 or 4 x 4 flood and drains. This is going to fix a lot of my problems and i see the possibilities...with stunning alacrity.

Shit tends to work out. But it is more fun than a bag of squirrels figuring all of it out. With some help from Hydrored! :D thanks man!!!
 

gwheels

Hobby Farmer
I have a couple of flood and drain questions....
1) The roots are out of the bottom of the pot. Do you just leave them like that? They float around a bit in the solution that never goes in the drain (1/4 inch of solution). This is probably ideal because they are always wet in solution.

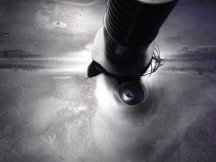
2) I got an awesome 1 3/8 bit that worked great for the first one and chewed the hole kind of screwed up in the 2nd. I will probably get some silicone to cover the hole (the 1 3/8 hole has chewed out a 1/2 inch gap outside of the flood and drain fittings). You think bathroom silicone would work? Or is there a better adhesive to cover a 1/2 inch hole in a flood and drain tray?

My new plan is to eventually use that solo cup hydrofarm to start plants to fit in the flood and drain.... And both flood and drain systems will be in the bloom room. Flood and Drain#2 is the Eso Test Kitchen ! or....who knows but its in use in the next 3 weeks !
 

Hydro

PICK YOUR OWN
I have a couple of flood and drain questions....
1) The roots are out of the bottom of the pot. Do you just leave them like that? They float around a bit in the solution that never goes in the drain (1/4 inch of solution). This is probably ideal because they are always wet in solution.

2) I got an awesome 1 3/8 bit that worked great for the first one and chewed the hole kind of screwed up in the 2nd. I will probably get some silicone to cover the hole (the 1 3/8 hole has chewed out a 1/2 inch gap outside of the flood and drain fittings). You think bathroom silicone would work? Or is there a better adhesive to cover a 1/2 inch hole in a flood and drain tray?

My new plan is to eventually use that solo cup hydrofarm to start plants to fit in the flood and drain.... And both flood and drain systems will be in the bloom room. Flood and Drain#2 is the Eso Test Kitchen ! or....who knows but its in use in the next 3 weeks !
I cant wrap my head around the 1/2" hole outside of the 1-3/8? You got a pic? The F&D fittings should more than enough to cover the hole made to fit the fitting into by at least 1/4" or more. I dont recommend any kind of silicones for that stuff. Its either right or its not kinda deal. Your asking for leaks/trouble if it dont work right without silicones etc.
As for the roots, its perfectly fine to have the roots outside of the pots and siting in the water left in the tray after each flood.
 

gwheels

Hobby Farmer
The busted out part is the problem. It grabbed hard like turpman said (i will put it in reverse next time)

I think i will just cut a piece of black lid (from a different tote) and drill a 1 3/8 hole in it and put it under the system. It is just to prevent light leaks really. I can get 2 and put one on top as well and no silicone required!

The other hole is perfect. The mangled stuff is hidden by the drain collar.

DSCF1702.JPG
 

Hydro

PICK YOUR OWN
The busted out part is the problem. It grabbed hard like turpman said (i will put it in reverse next time)

I think i will just cut a piece of black lid (from a different tote) and drill a 1 3/8 hole in it and put it under the system. It is just to prevent light leaks really. I can get 2 and put one on top as well and no silicone required!

The other hole is perfect. The mangled stuff is hidden by the drain collar.

View attachment 14178
Ok, I gotcha now. Considering the tray sits above the tote, a minor leak or some drips wont affect anything unless it comes out faster than it can fill. Turpmans suggestion should work aces.
 

BigBallzWillie

BE THE BALL
Without glue, I'd find an adapter or bulkhead for that part going thru the tray and drill a larger hole for that adapter (over botched hole). No glue needed, nothing will stick to that plastic for any length of time anyway.

But it's just a drain, so you could get some polyurethane caulk, bead it good around bottom, adjust pump if required and be good to go.
 
Top