HydroRed's DIY Bubble Cloner (under $35)

gwheels

Hobby Farmer
For the bubble cloner. What do you put in the water in the res?
Just PHd Water ? Or do you add silica and calmag and some mc
I am going to adjust my grow room and use a tent instead of a puny grow box. Time to fire this up. I might have already had a keeper that i couldnt keep. I am fixing that from here on in.
And I will use the 5 foot tent not in use to keep a mom or two when i find the ones to rule them all !
 

Armdog

RDWC GROWER
For the bubble cloner. What do you put in the water in the res?
Just PHd Water ? Or do you add silica and calmag and some mc
I am going to adjust my grow room and use a tent instead of a puny grow box. Time to fire this up. I might have already had a keeper that i couldnt keep. I am fixing that from here on in.
And I will use the 5 foot tent not in use to keep a mom or two when i find the ones to rule them all !
I just use clonex in mine with distilled warter. like heisen said you don't know what pathogens are in your tap water.
 

Armdog

RDWC GROWER
PARTS LIST:

(1) 10 Gallon Rectangular Tote with locking lid
(Approx. dimensions 21" x 16" x 9") -$6.00

(4) 14" Aquarium Bubble Stones -$10.00

(1) 20-60 Gallon Dual Outlet Aquarium Air Pump -$9.00

(1) 1/2" ID Rubber Grommet -$0.29

(1) 1/2" Barbed 90* Fitting -$0.59

(1) 12" Piece of 1/2" Clear Tubing -$1.00

(1) 25' Length of 1/4" Silicone Tubing -$3.00

(1) Ebay Digital Aquarium Water Thermometer -$3.00

(13) 2" Neoprene Plugs -$6.00

(2) 1/4" Barbed "T's" -$1.00
View attachment 662

View attachment 663

NOTES:

All parts can be aquired at your local home improvement store/Walmart & Ebay

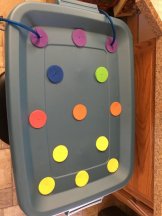
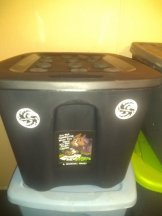
Be sure to pay attention to the top of the lid for the tote.
It's shape affects its function so look for a tote with a locking lid that is recessed down
lower from the edge to the center -keeping water from dripping out from the sealing edge of the container and lid.
(Use picture of tote for example)


TOOLS REQUIRED:

3/4" Hole Saw Spade Bit

1-3/4" Hole Saw

Tape Measure

Marker

Drill
View attachment 670
____________________________________________________________________________________________________________________


DIRECTIONS:

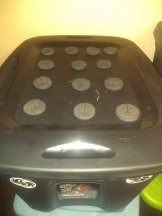
-Mark out your desired neoprene plug destinations on the lid.

-Drill out the holes for the 2" neoprene plugs with the 1-3/4" Hole saw.
View attachment 664
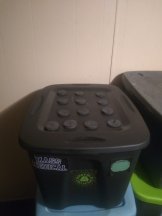
-Drill hole in the side wall of your tote near the bottom for your drain/sight tube
with the 3/4" hole spade bit. **Careful not to put the hole on/near any curved part of the tote
as this will make sealing the grommet virtually impossible.
(Note the ideal placement of the hole in the picture.)
View attachment 665
-Apply the rubber grommet to the 1" hole.

-Apply the 1/2" barbed 90* fitting into the 12" sight tubing, then apply the barbed fitting into the rubber grommet.
(This will be a bit tight and hard to get in, but you want this for a good water tight seal.)

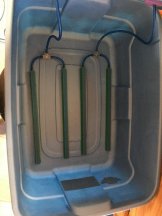
-Attach 2 airstones together with the 1/4" barbed "T" fitting as shown.
View attachment 669
-Connect each set of air stones to the air pump and align them in the bottom of the tote after feeding them through
the neoprene plugs in the lid. Feed the probe for the temp gauge & the air pump tubing through the neoprene plug.(As seen in picture.)
View attachment 666

View attachment 668


You can drill some 1/4" holes in the lid and feed the air tubes through that if you dont want to give up any spaces
for your clones. I only run 10 clones at a time so I dont mind giving up 3 spots for the tubes and probe.

-Fill reservoir up to approx 1" under the bottom of the cuttings and mark your sight tube so you know where to fill
to in the future and this also alerts you as to when your reservoir levels are low. Trim the sight tube to size.
View attachment 667
-Let the airstones soak in the water for an hour BEFORE tuning on the air pump. Your stone will work much more
effectively if you do this first.

-Your bubble cloner is now ready to root clones.
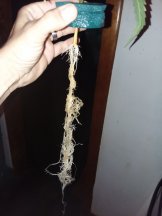
With this set-up, you should have huge roots in 7-14 days.
Keep in mind, you can apply this build to any size tote you choose and have as many sites as you care to fit on the tote you use.
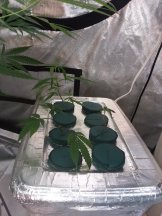
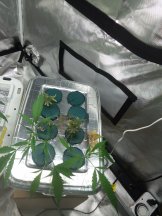
Replecated your cloner but added a 4 port air pump and it cloned all 8 cutting in 10 days. 10 Mills per gallon of clonex and 1 drop per gallon superthrive added to distilled water. Works great, supercharged air in this baby. 🤓
 

Armdog

RDWC GROWER
PARTS LIST:

(1) 10 Gallon Rectangular Tote with locking lid
(Approx. dimensions 21" x 16" x 9") -$6.00

(4) 14" Aquarium Bubble Stones -$10.00

(1) 20-60 Gallon Dual Outlet Aquarium Air Pump -$9.00

(1) 1/2" ID Rubber Grommet -$0.29

(1) 1/2" Barbed 90* Fitting -$0.59

(1) 12" Piece of 1/2" Clear Tubing -$1.00

(1) 25' Length of 1/4" Silicone Tubing -$3.00

(1) Ebay Digital Aquarium Water Thermometer -$3.00

(13) 2" Neoprene Plugs -$6.00

(2) 1/4" Barbed "T's" -$1.00
View attachment 662

View attachment 663

NOTES:

All parts can be aquired at your local home improvement store/Walmart & Ebay

Be sure to pay attention to the top of the lid for the tote.
It's shape affects its function so look for a tote with a locking lid that is recessed down
lower from the edge to the center -keeping water from dripping out from the sealing edge of the container and lid.
(Use picture of tote for example)


TOOLS REQUIRED:

3/4" Hole Saw Spade Bit

1-3/4" Hole Saw

Tape Measure

Marker

Drill
View attachment 670
____________________________________________________________________________________________________________________


DIRECTIONS:

-Mark out your desired neoprene plug destinations on the lid.

-Drill out the holes for the 2" neoprene plugs with the 1-3/4" Hole saw.
View attachment 664
-Drill hole in the side wall of your tote near the bottom for your drain/sight tube
with the 3/4" hole spade bit. **Careful not to put the hole on/near any curved part of the tote
as this will make sealing the grommet virtually impossible.
(Note the ideal placement of the hole in the picture.)
View attachment 665
-Apply the rubber grommet to the 1" hole.

-Apply the 1/2" barbed 90* fitting into the 12" sight tubing, then apply the barbed fitting into the rubber grommet.
(This will be a bit tight and hard to get in, but you want this for a good water tight seal.)

-Attach 2 airstones together with the 1/4" barbed "T" fitting as shown.
View attachment 669
-Connect each set of air stones to the air pump and align them in the bottom of the tote after feeding them through
the neoprene plugs in the lid. Feed the probe for the temp gauge & the air pump tubing through the neoprene plug.(As seen in picture.)
View attachment 666

View attachment 668


You can drill some 1/4" holes in the lid and feed the air tubes through that if you dont want to give up any spaces
for your clones. I only run 10 clones at a time so I dont mind giving up 3 spots for the tubes and probe.

-Fill reservoir up to approx 1" under the bottom of the cuttings and mark your sight tube so you know where to fill
to in the future and this also alerts you as to when your reservoir levels are low. Trim the sight tube to size.
View attachment 667
-Let the airstones soak in the water for an hour BEFORE tuning on the air pump. Your stone will work much more
effectively if you do this first.

-Your bubble cloner is now ready to root clones.
With this set-up, you should have huge roots in 7-14 days.
Keep in mind, you can apply this build to any size tote you choose and have as many sites as you care to fit on the tote you use.
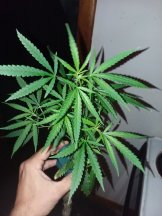
This is a cloning machine, 10 days roots everywhere. The only thing I did different was use a 4 port air pump, air definitely makes a difference.
 

Bodyne

PICK YOUR OWN
This is a cloning machine, 10 days roots everywhere. The only thing I did different was use a 4 port air pump, air definitely makes a difference.
Ditto. Got everything in my amazon cart ready to get with it, gonna get the tote this week. I too went with a four banger. Mine cost 45. so fiddy total with the tote. Can't get over you can get the set of hole saws for the price of the one size, don't ask, I have no idea why. Ended up using a friends. Can't wait to try this, I have to start incorporating clones into my repetoire soon. Great DIY tech right here, thank ya Red! Thinkin bout stealin an extra lid with the tote and cut out a six inch or bigger whole and down the road run a bubble tote under one light and see what happens. Be easy peasy. Hydroton, rockwool cubie, BAM! Red's MultiUse Bubbler
 

TheSpaceFarm

DopeCaveDave
Ditto. Got everything in my amazon cart ready to get with it, gonna get the tote this week. I too went with a four banger. Mine cost 45. so fiddy total with the tote. Can't get over you can get the set of hole saws for the price of the one size, don't ask, I have no idea why. Ended up using a friends. Can't wait to try this, I have to start incorporating clones into my repetoire soon. Great DIY tech right here, thank ya Red! Thinkin bout stealin an extra lid with the tote and cut out a six inch or bigger whole and down the road run a bubble tote under one light and see what happens. Be easy peasy. Hydroton, rockwool cubie, BAM! Red's MultiUse Bubbler
I thought about doing the same thing with one lol it would be super easy. Sounds fun. I just noticed the first roots today in mine. Almost 2 weeks but the water was like 65 degrees the whole time so I’m not surprised. No clonex or anything at all just cut and put in the cloner.
 

Bodyne

PICK YOUR OWN
Messed up and got ,18 gallon tote. Will get assembled and see what happens. $4.98 and there were no 10 gal to be found. Tired of waiting lol I can get impatient. I'll make it work.
 

Bodyne

PICK YOUR OWN
Well, there's good news and bad news. Somehow, from R&D to production line, shit got fucked sideways, I ordered the wrong shit from Amazon twice, realized my tote was 18 gallons instead of 10, etc. At any rate, before I threw it all out, I got an idea and implemented it. Hasn't been tested yet, R&D got me nervous, but I just went thru so basics and I think it will work. Wished I had this ready week or so ago @Schwaggy P lol. Bad news, no bubblers, two400gph sub water pumps using the big opening of the two lil nozzles they give ya. Thing is, tote at Wally world, 5$, 2 pumps Amazon 13$. Other thing is, I give all credit to @HydroRed for inspiration and idea, so I dedicated it to him. I call her black Betty, and she's wearing bad dog gear, lol. Things to note, I studied the splash for 15 mins or so, it's not a mister, but it throws a softer splash continually with the big noozzle, harder splash with smaller nozzle. Covers complete underneath, best I can tell all the time. I'll get to try out in few weeks. Another plus was where the handles are, they have 5 lil holes each one. Razor knife, connect 2, power cord to each pump on each of tote, don't have to use clone hole for power cords. Black Betty, inspired by Big Red.
 

Attachments

Hydro

PICK YOUR OWN
Well, there's good news and bad news. Somehow, from R&D to production line, shit got fucked sideways, I ordered the wrong shit from Amazon twice, realized my tote was 18 gallons instead of 10, etc. At any rate, before I threw it all out, I got an idea and implemented it. Hasn't been tested yet, R&D got me nervous, but I just went thru so basics and I think it will work. Wished I had this ready week or so ago @Schwaggy P lol. Bad news, no bubblers, two400gph sub water pumps using the big opening of the two lil nozzles they give ya. Thing is, tote at Wally world, 5$, 2 pumps Amazon 13$. Other thing is, I give all credit to @HydroRed for inspiration and idea, so I dedicated it to him. I call her black Betty, and she's wearing bad dog gear, lol. Things to note, I studied the splash for 15 mins or so, it's not a mister, but it throws a softer splash continually with the big noozzle, harder splash with smaller nozzle. Covers complete underneath, best I can tell all the time. I'll get to try out in few weeks. Another plus was where the handles are, they have 5 lil holes each one. Razor knife, connect 2, power cord to each pump on each of tote, don't have to use clone hole for power cords. Black Betty, inspired by Big Red.
What are you using to diperse the water inside the tote? Got a pic?
 

Bodyne

PICK YOUR OWN
I let em go 12 days, the two skunkys had a little green left, all else yeller, but upright. I used basic root powder and made new cuts, when I pulled, no mushy, but no sign of anything. Left under done 8 days. Should have put in water in frig overnight, then proceeded. Got excited, overwhelmed, shot the load in the floor. By God, I'm ready for bear now, lol @Schwaggy P
 
Last edited:

Bodyne

PICK YOUR OWN
What are you using to diperse the water inside the tote? Got a pic?
Those pumps come with like two nozzles, the upward height of the bigger one is close to two and half ft, two goin at once, keeps light water flow splashing against tote lid/clone holes over the whole lid. I hope it works, from some I've seen like the clone bucket, close to it. Lol if not, I got another tote for mvin I reckon lol
 

Bodyne

PICK YOUR OWN
So mine sux. You have to use the smaller size nozzle to get enough pressure to splash up against bottom of tote lid, and she does do some splashing. It does look like it will work, it does not look like it would work near as good as @HydroRed 's. Worryin bout one of the plugs comin loose and a fountain out the tote, right next to plug in or light. Brilliant. Anyhow, Sometimes I get excited. I will try it once, just to see.
 
Top