
Hydro
PICK YOUR OWN
This is an easy and affordable DIY Flood and Drain build. Anyone who knows me knows I like to do stuff on the cheap and this project is no different. This can be used either with the tray in the tote, or tray on a table and the tote as the reservoir.
PARTS NEEDED:
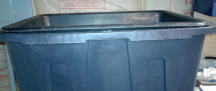
(1) "ODJOB" brand 7 gal mixing tray ($5.98 @ Lowes)

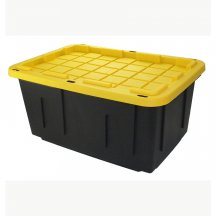
(1) "Commander XXL" brand 27 gal tote ($8.99 @ Lowes)
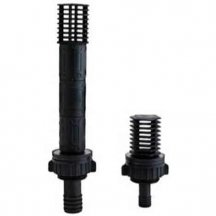
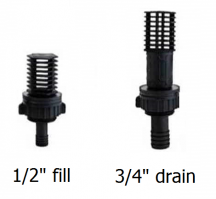
(1) 1/2" Fill - 3/4" Drain F&D bulkhead set ($8.99 @hydrostore or online)
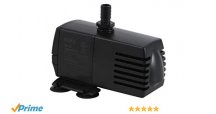
(1) 185 gph submersible pump ($12.49 at hydro shop or online)
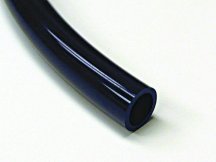
(2') 1/2" O.D. plastic tubing ($0.89 per ft at hydrostore or Lowes)
The way this will work, is that the tray sits inside the top of the res, leaving space under the tray in the res to hold the water. The F&D kits gets installed into the tray any way you choose to do so that it fits your needs and pot count in the tray. The submersible pump sits under the tray in the tote (reservoir) and the 1/2" tubing connects the pump to the fill side of the F&D kit. I have labeled some of the parts by brand name specifically because I know they are an absolute perfect fit when used together. I have built 4 sets of these for myself and many more for others. They have been in use in my rooms for yrs now without any issue or fail so I know they work and am confident it will work just as good for you!
INSTRUCTIONS:
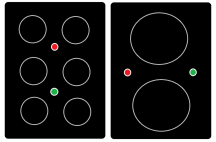
Drill out (2) 1-3/8" holes with a hole saw bit. The location of the holes should be dependent on how many pots you will be using and where you will be placing them. I use up to (6) 1gal pots so I drill mine accordingly but you can run any number of pots that you feel will work for you. Heres a couple examples of placement for your fill and drains with different pot sizes,count, and arrangements. Red represents fill, and green represents drain.
-Connect the bulkheads onto the tray, sure to use the included rubber washers. No silicone or anything like that should be needed. Just put the screen top on the fill side, and put 1 collar and a screen on the drain side. Be sure you put the right pieces on the right sides or your table wont fill or drain properly. Again, you want just the screen top on the 1/2" fill bulkhead, and the collar AND the screen top on the 3/4" drain bulkhead (as shown).
-Use the (2') of 1/2" tubing to connect the fill bulkhead on the bottom of the tray to the submersible pump and place the pump in the tote (reservoir).
-Place the tray into the top of the 27 gal tote (reservoir). Be sure there are no kinks in the 1/2" line when you place the tray into the tote. If there is, just cut some of the excess off so the line sets in the res comfortably connected to the submersible pump.
-No tubing is needed for the drain portion since it will naturally just drain right back into the tote (reservoir) once the desired flood depth is achieved.
-Fill with water. I usually fill with 12 gal as this is enough to flood the tray, and still keep enough in the res so ther pump doesnt run dry or suck air.
-Connect the power cord from the submersible pump to a timer and set it to flood 15 min every 3-4 hrs (or as you feel is needed). This should be a good starting point until you determine the frequency of your floods. Once the timer cuts off, gravity will make the water flow back down to the res through the fill bulkhead and down through the submersible pump.
-Fill the tray with your potted plants in hydroton, adjust your nutrient strength & pH, and get to flooding -YOU'RE DONE!
TIPS:
Make sure the holes in the pots you use arent bigger than the hydroton (or whatever medium you use) or it will spill out during floods and make a mess of your clean flood tray and you'll be constantly picking out medium.
Be sure your tray sits flush down inside of the tote. You dont want any light in your reservoir. This is why I was "brand specific" on the tray and tote.
If you notice your flood level isnt where it once was, or if you notice bubbles coming from the fill while flooding -its time to add to the res.
You can use a sight tube to keep track of where your water level is or you can mark a line on the reservoir as a reference of where the water level should be.
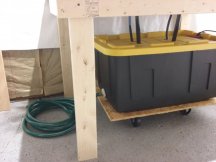
You can use furniture dollies under the tote to make moving them around an easy task.
This same setup can be used on a table simply by getting the appropriate length of 1/2" and 3/4" tubing to run from the tray to pump in the res by drilling holes in the lid for the tubing to run through like shown:
PARTS NEEDED:
(1) "ODJOB" brand 7 gal mixing tray ($5.98 @ Lowes)
(1) "Commander XXL" brand 27 gal tote ($8.99 @ Lowes)
(1) 1/2" Fill - 3/4" Drain F&D bulkhead set ($8.99 @hydrostore or online)
(1) 185 gph submersible pump ($12.49 at hydro shop or online)
(2') 1/2" O.D. plastic tubing ($0.89 per ft at hydrostore or Lowes)
The way this will work, is that the tray sits inside the top of the res, leaving space under the tray in the res to hold the water. The F&D kits gets installed into the tray any way you choose to do so that it fits your needs and pot count in the tray. The submersible pump sits under the tray in the tote (reservoir) and the 1/2" tubing connects the pump to the fill side of the F&D kit. I have labeled some of the parts by brand name specifically because I know they are an absolute perfect fit when used together. I have built 4 sets of these for myself and many more for others. They have been in use in my rooms for yrs now without any issue or fail so I know they work and am confident it will work just as good for you!
INSTRUCTIONS:
Drill out (2) 1-3/8" holes with a hole saw bit. The location of the holes should be dependent on how many pots you will be using and where you will be placing them. I use up to (6) 1gal pots so I drill mine accordingly but you can run any number of pots that you feel will work for you. Heres a couple examples of placement for your fill and drains with different pot sizes,count, and arrangements. Red represents fill, and green represents drain.
-Connect the bulkheads onto the tray, sure to use the included rubber washers. No silicone or anything like that should be needed. Just put the screen top on the fill side, and put 1 collar and a screen on the drain side. Be sure you put the right pieces on the right sides or your table wont fill or drain properly. Again, you want just the screen top on the 1/2" fill bulkhead, and the collar AND the screen top on the 3/4" drain bulkhead (as shown).
-Use the (2') of 1/2" tubing to connect the fill bulkhead on the bottom of the tray to the submersible pump and place the pump in the tote (reservoir).
-Place the tray into the top of the 27 gal tote (reservoir). Be sure there are no kinks in the 1/2" line when you place the tray into the tote. If there is, just cut some of the excess off so the line sets in the res comfortably connected to the submersible pump.
-No tubing is needed for the drain portion since it will naturally just drain right back into the tote (reservoir) once the desired flood depth is achieved.
-Fill with water. I usually fill with 12 gal as this is enough to flood the tray, and still keep enough in the res so ther pump doesnt run dry or suck air.
-Connect the power cord from the submersible pump to a timer and set it to flood 15 min every 3-4 hrs (or as you feel is needed). This should be a good starting point until you determine the frequency of your floods. Once the timer cuts off, gravity will make the water flow back down to the res through the fill bulkhead and down through the submersible pump.
-Fill the tray with your potted plants in hydroton, adjust your nutrient strength & pH, and get to flooding -YOU'RE DONE!
TIPS:
Make sure the holes in the pots you use arent bigger than the hydroton (or whatever medium you use) or it will spill out during floods and make a mess of your clean flood tray and you'll be constantly picking out medium.
Be sure your tray sits flush down inside of the tote. You dont want any light in your reservoir. This is why I was "brand specific" on the tray and tote.
If you notice your flood level isnt where it once was, or if you notice bubbles coming from the fill while flooding -its time to add to the res.
You can use a sight tube to keep track of where your water level is or you can mark a line on the reservoir as a reference of where the water level should be.
You can use furniture dollies under the tote to make moving them around an easy task.
This same setup can be used on a table simply by getting the appropriate length of 1/2" and 3/4" tubing to run from the tray to pump in the res by drilling holes in the lid for the tubing to run through like shown:
Last edited:
