Hydro
PICK YOUR OWN
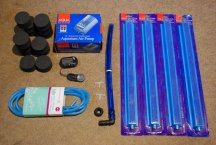
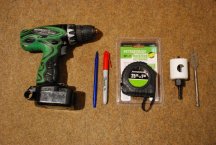
PARTS LIST:
(1) 10 Gallon Rectangular Tote with locking lid
(Approx. dimensions 21" x 16" x 9") -$6.00
(4) 14" Aquarium Bubble Stones -$10.00
(1) 20-60 Gallon Dual Outlet Aquarium Air Pump -$9.00
(1) 1/2" ID Rubber Grommet -$0.29
(1) 1/2" Barbed 90* Fitting -$0.59
(1) 12" Piece of 1/2" Clear Tubing -$1.00
(1) 25' Length of 1/4" Silicone Tubing -$3.00
(1) Ebay Digital Aquarium Water Thermometer -$3.00
(13) 2" Neoprene Plugs -$6.00
(2) 1/4" Barbed "T's" -$1.00
NOTES:
All parts can be aquired at your local home improvement store/Walmart & Ebay
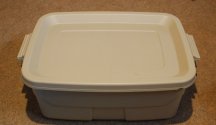
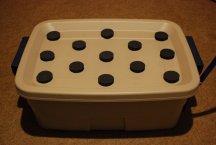
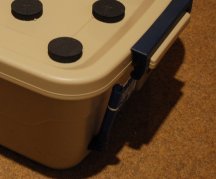
Be sure to pay attention to the top of the lid for the tote.
It's shape affects its function so look for a tote with a locking lid that is recessed down
lower from the edge to the center -keeping water from dripping out from the sealing edge of the container and lid.
(Use picture of tote for example)
TOOLS REQUIRED:
3/4" Hole Saw Spade Bit
1-3/4" Hole Saw
Tape Measure
Marker
Drill
____________________________________________________________________________________________________________________
DIRECTIONS:
-Mark out your desired neoprene plug destinations on the lid.
-Drill out the holes for the 2" neoprene plugs with the 1-3/4" Hole saw.
-Drill hole in the side wall of your tote near the bottom for your drain/sight tube
with the 3/4" hole spade bit. **Careful not to put the hole on/near any curved part of the tote
as this will make sealing the grommet virtually impossible.
(Note the ideal placement of the hole in the picture.)
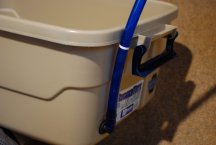
-Apply the rubber grommet to the 1" hole.
-Apply the 1/2" barbed 90* fitting into the 12" sight tubing, then apply the barbed fitting into the rubber grommet.
(This will be a bit tight and hard to get in, but you want this for a good water tight seal.)
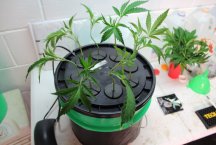
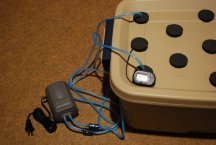
-Attach 2 airstones together with the 1/4" barbed "T" fitting as shown.
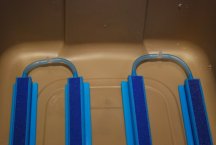
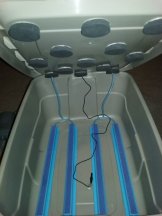
-Connect each set of air stones to the air pump and align them in the bottom of the tote after feeding them through
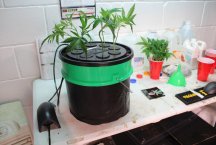
the neoprene plugs in the lid. Feed the probe for the temp gauge & the air pump tubing through the neoprene plug.(As seen in picture.)
You can drill some 1/4" holes in the lid and feed the air tubes through that if you dont want to give up any spaces
for your clones. I only run 10 clones at a time so I dont mind giving up 3 spots for the tubes and probe.
-Fill reservoir up to approx 1" under the bottom of the cuttings and mark your sight tube so you know where to fill
to in the future and this also alerts you as to when your reservoir levels are low. Trim the sight tube to size.
-Let the airstones soak in the water for an hour BEFORE tuning on the air pump. Your stone will work much more
effectively if you do this first.
-Your bubble cloner is now ready to root clones.
With this set-up, you should have huge roots in 7-14 days.
Keep in mind, you can apply this build to any size tote you choose and have as many sites as you care to fit on the tote you use.
(1) 10 Gallon Rectangular Tote with locking lid
(Approx. dimensions 21" x 16" x 9") -$6.00
(4) 14" Aquarium Bubble Stones -$10.00
(1) 20-60 Gallon Dual Outlet Aquarium Air Pump -$9.00
(1) 1/2" ID Rubber Grommet -$0.29
(1) 1/2" Barbed 90* Fitting -$0.59
(1) 12" Piece of 1/2" Clear Tubing -$1.00
(1) 25' Length of 1/4" Silicone Tubing -$3.00
(1) Ebay Digital Aquarium Water Thermometer -$3.00
(13) 2" Neoprene Plugs -$6.00
(2) 1/4" Barbed "T's" -$1.00
NOTES:
All parts can be aquired at your local home improvement store/Walmart & Ebay
Be sure to pay attention to the top of the lid for the tote.
It's shape affects its function so look for a tote with a locking lid that is recessed down
lower from the edge to the center -keeping water from dripping out from the sealing edge of the container and lid.
(Use picture of tote for example)
TOOLS REQUIRED:
3/4" Hole Saw Spade Bit
1-3/4" Hole Saw
Tape Measure
Marker
Drill
____________________________________________________________________________________________________________________
DIRECTIONS:
-Mark out your desired neoprene plug destinations on the lid.
-Drill out the holes for the 2" neoprene plugs with the 1-3/4" Hole saw.
-Drill hole in the side wall of your tote near the bottom for your drain/sight tube
with the 3/4" hole spade bit. **Careful not to put the hole on/near any curved part of the tote
as this will make sealing the grommet virtually impossible.
(Note the ideal placement of the hole in the picture.)
-Apply the rubber grommet to the 1" hole.
-Apply the 1/2" barbed 90* fitting into the 12" sight tubing, then apply the barbed fitting into the rubber grommet.
(This will be a bit tight and hard to get in, but you want this for a good water tight seal.)
-Attach 2 airstones together with the 1/4" barbed "T" fitting as shown.
-Connect each set of air stones to the air pump and align them in the bottom of the tote after feeding them through
the neoprene plugs in the lid. Feed the probe for the temp gauge & the air pump tubing through the neoprene plug.(As seen in picture.)
You can drill some 1/4" holes in the lid and feed the air tubes through that if you dont want to give up any spaces
for your clones. I only run 10 clones at a time so I dont mind giving up 3 spots for the tubes and probe.
-Fill reservoir up to approx 1" under the bottom of the cuttings and mark your sight tube so you know where to fill
to in the future and this also alerts you as to when your reservoir levels are low. Trim the sight tube to size.
-Let the airstones soak in the water for an hour BEFORE tuning on the air pump. Your stone will work much more
effectively if you do this first.
-Your bubble cloner is now ready to root clones.
With this set-up, you should have huge roots in 7-14 days.
Keep in mind, you can apply this build to any size tote you choose and have as many sites as you care to fit on the tote you use.
Last edited: