
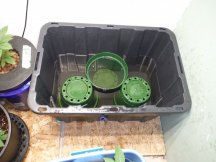
HydroRed's DIY Budget Flood and Drain (approx $40 total)
gwheels
Hobby Farmer
Has anyone used pro mix as the media for their flood and drain?
I need to get more coco coir and that stuff is pretty cheap for a brick.
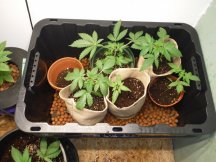
And this time 3 coco bricks....the coco works great in flood and drain with a felt pot. The growth is pretty amazing and the 2 litre pots are only half full (i really need a brick of coco!)
With a flood and drain if you had say a single 5 gallon pot in a flood and drain tray do you think it would get really big ? When you dont veg them they get pretty big but if you had a giant root filled pot.....
I have to find out.
I need to get more coco coir and that stuff is pretty cheap for a brick.
And this time 3 coco bricks....the coco works great in flood and drain with a felt pot. The growth is pretty amazing and the 2 litre pots are only half full (i really need a brick of coco!)
With a flood and drain if you had say a single 5 gallon pot in a flood and drain tray do you think it would get really big ? When you dont veg them they get pretty big but if you had a giant root filled pot.....
I have to find out.
Any of you guys seen those long totes at Wal-Mart, I guess they're for Christmas trees cause I usually only see them around this time of yr. They have sort've a raised lid that can be flipped upside down and sits down in the tote pretty good. I think the lid may be deep enough for flood and drain and definitely good for a drip system. Only thing is they need painting or covering to block light cause there transparent. There pretty big, not good for a small tent.
Texagonian
Outlaw
I may have to look and see what you’re talking about. I think I know which one. I’d be concerned with the lid being able to hold the weight of the plants and water without compromising.Any of you guys seen those long totes at Wal-Mart, I guess they're for Christmas trees cause I usually only see them around this time of yr. They have sort've a raised lid that can be flipped upside down and sits down in the tote pretty good. I think the lid may be deep enough for flood and drain and definitely good for a drip system. Only thing is they need painting or covering to block light cause there transparent. There pretty big, not good for a small tent.
gwheels
Hobby Farmer
I have 3 of them going. To make life easier i put a power bar on 1 timer so they all go at the same time. I ran out of timers !
A smaller veg one is fantastic. If it is easier to clean you can use it for coco too just set that filter a little higher to stop it from falling in the res. Clean it out and h202 the res every 3 days. And the top of the pots stays dry. it only waters from the bottom.
Suck it gnats !
A smaller veg one is fantastic. If it is easier to clean you can use it for coco too just set that filter a little higher to stop it from falling in the res. Clean it out and h202 the res every 3 days. And the top of the pots stays dry. it only waters from the bottom.
Suck it gnats !
gwheels
Hobby Farmer
This is a fantastic flood and drain but that tray is expensive in the great white north. I was wandering crappy tire the other day and they have a 70 litre that fits in the 127.
Today i feel so very grateful for the idea @HydroRed thanks man !!!.
What i like about the higher sides is the fabric pots have more stability.
the weird checkerboard bottom on the tote required hydorton. @Texagonian did this in his pics and it is brilliant. I just increased the height on the drain tube. The fill tube will drain when its done.
And this is the best way to veg plants i have ever done. But use a good nute. I stick to AN trio. 10 gallons required 15 ml of calmagic 26 ,ml micro grow bloom. TDS 750.
Why this works better than bloom
cooler temps.... a chiller would fix my bloom problems...man i learn new stuff every day. or at least every week or so i know lots of shit already....
Did you know...you all tie your damned shoelaces backwards? Its true i used to lead every presentation with it.
The loup should go the opposite of what you do...its why your moms would stay tied so long.
The way you should do it the knot tightens as you walk....the way you do it that shit comes untied.
So yeah...i had a big giant bong rip of citrus milf hash....and you tie your damned shoes wrong...
Oh the shit I know..it could fill a library.
Lord Bowler
Member
I've lurked this site now and then for a few months, but never saw this thread. I'm gonna try this right away. I love DIY projects that save $$. Much thanks for the information.This is an easy and affordable DIY Flood and Drain build. Anyone who knows me knows I like to do stuff on the cheap and this project is no different. This can be used either with the tray in the tote, or tray on a table and the tote as the reservoir.
PARTS NEEDED:
(1) "ODJOB" brand 7 gal mixing tray ($5.98 @ Lowes)
View attachment 675
(1) "Commander XXL" brand 27 gal tote ($8.99 @ Lowes)
View attachment 674
(1) 1/2" Fill - 3/4" Drain F&D bulkhead set ($8.99 @hydrostore or online)
View attachment 676
(1) 185 gph submersible pump ($12.49 at hydro shop or online)
View attachment 677
(2') 1/2" O.D. plastic tubing ($0.89 per ft at hydrostore or Lowes)
View attachment 678
The way this will work, is that the tray sits inside the top of the res, leaving space under the tray in the res to hold the water. The F&D kits gets installed into the tray any way you choose to do so that it fits your needs and pot count in the tray. The submersible pump sits under the tray in the tote (reservoir) and the 1/2" tubing connects the pump to the fill side of the F&D kit. I have labeled some of the parts by brand name specifically because I know they are an absolute perfect fit when used together. I have built 4 sets of these for myself and many more for others. They have been in use in my rooms for yrs now without any issue or fail so I know they work and am confident it will work just as good for you!
INSTRUCTIONS:
Drill out (2) 1-3/8" holes with a hole saw bit. The location of the holes should be dependent on how many pots you will be using and where you will be placing them. I use up to (6) 1gal pots so I drill mine accordingly but you can run any number of pots that you feel will work for you. Heres a couple examples of placement for your fill and drains with different pot sizes,count, and arrangements. Red represents fill, and green represents drain.
View attachment 682
-Connect the bulkheads onto the tray, sure to use the included rubber washers. No silicone or anything like that should be needed. Just put the screen top on the fill side, and put 1 collar and a screen on the drain side. Be sure you put the right pieces on the right sides or your table wont fill or drain properly. Again, you want just the screen top on the 1/2" fill bulkhead, and the collar AND the screen top on the 3/4" drain bulkhead (as shown).
View attachment 686
-Use the (2') of 1/2" tubing to connect the fill bulkhead on the bottom of the tray to the submersible pump and place the pump in the tote (reservoir).
-Place the tray into the top of the 27 gal tote (reservoir). Be sure there are no kinks in the 1/2" line when you place the tray into the tote. If there is, just cut some of the excess off so the line sets in the res comfortably connected to the submersible pump.
View attachment 687
-No tubing is needed for the drain portion since it will naturally just drain right back into the tote (reservoir) once the desired flood depth is achieved.
-Fill with water. I usually fill with 12 gal as this is enough to flood the tray, and still keep enough in the res so ther pump doesnt run dry or suck air.
-Connect the power cord from the submersible pump to a timer and set it to flood 15 min every 3-4 hrs (or as you feel is needed). This should be a good starting point until you determine the frequency of your floods. Once the timer cuts off, gravity will make the water flow back down to the res through the fill bulkhead and down through the submersible pump.
-Fill the tray with your potted plants in hydroton, adjust your nutrient strength & pH, and get to flooding -YOU'RE DONE!
TIPS:
Make sure the holes in the pots you use arent bigger than the hydroton (or whatever medium you use) or it will spill out during floods and make a mess of your clean flood tray and you'll be constantly picking out medium.
Be sure your tray sits flush down inside of the tote. You dont want any light in your reservoir. This is why I was "brand specific" on the tray and tote.
If you notice your flood level isnt where it once was, or if you notice bubbles coming from the fill while flooding -its time to add to the res.
You can use a sight tube to keep track of where your water level is or you can mark a line on the reservoir as a reference of where the water level should be.
You can use furniture dollies under the tote to make moving them around an easy task.
This same setup can be used on a table simply by getting the appropriate length of 1/2" and 3/4" tubing to run from the tray to pump in the res by drilling holes in the lid for the tubing to run through like shown:
View attachment 1889
gwheels
Hobby Farmer
I just had a giant EUREKA...i am going to find a table the right size to fit in the room and build a table as low as can clear.
1 big flood and drain table and no more hand watering. I like that a lot. I am on the hunt for something up to 2 1/2 x 5 ish. I love a project.
I am going to get measuring...this would be PERFECT !
I am going to measure because they make one 47 x 33 x 5 1/2" too This would make it so much easier than spilling water and coco everywhere.
33 inches exactly...i will think about it...the light went off just as i started checking it out.
 www.uline.ca
And nevermind...they have a sale on actual flood and drain trays. i will measure it up and boot out there on Wednesday. That is easier.
1 big flood and drain table and no more hand watering. I like that a lot. I am on the hunt for something up to 2 1/2 x 5 ish. I love a project.
I am going to get measuring...this would be PERFECT !
I am going to measure because they make one 47 x 33 x 5 1/2" too
This would make it so much easier than spilling water and coco everywhere.33 inches exactly...i will think about it...the light went off just as i started checking it out.
Uline Utility Tray - 20 Gallon, 39 x 27 x 5 1/2
Storage for paint cans, oily parts and leaky car batteries. Corrosion-resistant polyethylene. Nestable. Ribbed bottom. Contents rest above spills. ULINE offers over 43,000 boxes, plastic poly bags, mailing tubes, warehouse supplies and bubble wrap for your storage, packaging, or shipping supplies.
And nevermind...they have a sale on actual flood and drain trays. i will measure it up and boot out there on Wednesday. That is easier.
Last edited: