
Tinkering, Testing and Dusting
- Thread starter SSGrower
- Start date
SSGrower
Average Grower
@macsnax
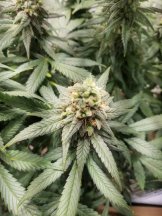
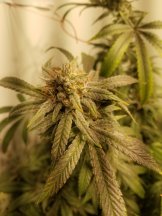
CNC f2 dusted by CNC
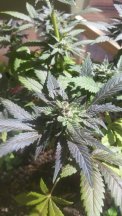
Oregon Huckelberry dusted by cnc
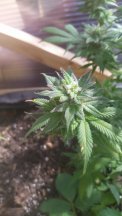
The Oregon Huckelberry is a fairly fast finisher. Plant is small stature, slow growing and very light feeder/drinker. I am looking at it for its outdoor potential in CO and similar environments.
The Lucinda Williams x cnc is what I intend to focus some effort on and may try crossing it with the read headed stranger x cnc if both look good. Concerned about high leaf to calyx ratio on the non seeded cnc I have, though the seeded one (macs f2) looks alot better.
CNC f2 dusted by CNC
Oregon Huckelberry dusted by cnc
The Oregon Huckelberry is a fairly fast finisher. Plant is small stature, slow growing and very light feeder/drinker. I am looking at it for its outdoor potential in CO and similar environments.
The Lucinda Williams x cnc is what I intend to focus some effort on and may try crossing it with the read headed stranger x cnc if both look good. Concerned about high leaf to calyx ratio on the non seeded cnc I have, though the seeded one (macs f2) looks alot better.
SaintyMcCunt
The Convict
Subbed in now 
SSGrower
Average Grower
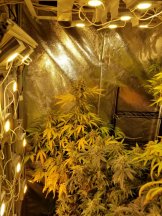
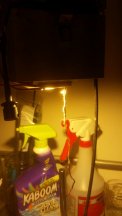
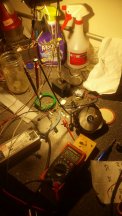
Some low tech.
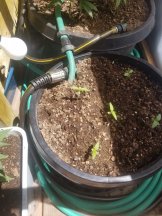
Those hoses arent for watering the plants at this point, they contain water warmed by an aquarium heater that is in a 6 gallon bucket with pump that circulates it through the hoses. Each container has 10-15 feet of hose burried in it, and there is about another 150 feet coiled up in the coldframe/mini greenhouse.
Those hoses arent for watering the plants at this point, they contain water warmed by an aquarium heater that is in a 6 gallon bucket with pump that circulates it through the hoses. Each container has 10-15 feet of hose burried in it, and there is about another 150 feet coiled up in the coldframe/mini greenhouse.
SSGrower
Average Grower
WCaP recipie
Eggshells - remove lining, soak in hot water to aid.
Break shells up into 1/4in pieces annd toast @400F for 20-40 minutes, really you can use any method (skillet, grill, fire). Warning - not the most plesant smell.
Degree of toasting shifts focus of availabilty for Phosphorus vs. Calcium, IIRC more toasted shfts to Ca. But do your own verrification before quoting me on that.
Grind shells to a fine powder, place in jar leaving lots of head space, you will be adding 5x volume vinegar and the reaction releases some energy so I use a pint jar for few tbs of eggshell.
SLOWLY add vinegar, you can go organic apple cider or plain distilled, I have found if using apple cider a bit more is nedded.
Allow to sit in a warm dark location for 10-20 days stirring daily. There will be a drop off in bubbling when the chemical reaction is done. Leave for several days after this to take advantage of biological interactions. The material can be inoculated when pH gets to an acceptable level for the microbes, I suspect this is somewhere between 4 and 5 pH but IDK.
In addition to calcium and phosphorous, there is some k, mg, and other micros but lacking a GC no quatification of the mixture, I dilute to 100-300 ppm above bg tap water and feed via soil, I dont foliar.
SSGrower
Average Grower
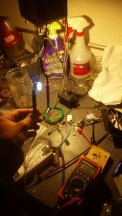
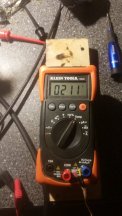
This seems like it will work but apparently the 10A side of my multimeter is blown so when I kept switching back and forth between the 400ma and 10A trying to figure why I'm not getting a reading, I blew the 400ma side. Fuck me.
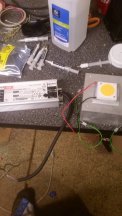
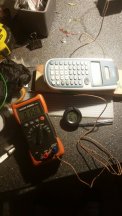
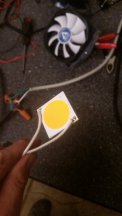
That is a COB on a peltier at 50 watts it was running 2.6V @337mA at 60 watts I blew the multimeter.
That is a COB on a peltier at 50 watts it was running 2.6V @337mA at 60 watts I blew the multimeter.
Streetpro09
Tester
Can you open the multi meter and replace the fuse? Usually there are two fuses inside. One for each amp setting.This seems like it will work but apparently the 10A side of my multimeter is blown so when I kept switching back and forth between the 400ma and 10A trying to figure why I'm not getting a reading, I blew the 400ma side. Fuck me.
View attachment 5941
View attachment 5943
View attachment 5944
That is a COB on a peltier at 50 watts it was running 2.6V @337mA at 60 watts I blew the multimeter.
SSGrower
Average Grower
Half step ahead of you, got fuses from HD unfortunately they are lower voltage rating so I will have a 250V meter instead of a 500V.Can you open the multi meter and replace the fuse? Usually there are two fuses inside. One for each amp setting.
Detoured on the way home tho.

Streetpro09
Tester
I think you'll get by with 250v.Half step ahead of you, got fuses from HD unfortunately they are lower voltage rating so I will have a 250V meter instead of a 500V.
Detoured on the way home tho.
View attachment 5957
")
Can't say I've seen a yard house before. Had to Google it before posting. Not a big chain food kinda person but I'd give it a try!
ChiefRunningPhist
Drunk on Knowledge
Does that multimeter do both AC & DC? It almost looks geared to AC but maybe the func button switches mode?
SSGrower
Average Grower
Yes function button toggles, it defaults to AC.Does that multimeter do both AC & DC? It almost looks geared to AC but maybe the func button switches mode?
Attachments
-
 127.3 KB Views: 116
 -
 136.6 KB Views: 108
 -
 96.3 KB Views: 77
SSGrower
Average Grower
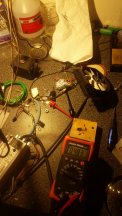
Those were with the head unit of an led flashlight.
These are with the pwm fan as th load.
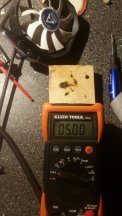
Notice the wattage is half what it is for the leds. Why?
I have to disconnect whatever device is connected to the peltier in order to take voltage and temp readings. I can load the temp probe on top of the terminal leads but is there a way to set this up so the peltier stays loaded while I switch between readings?
These are with the pwm fan as th load.
Notice the wattage is half what it is for the leds. Why?
I have to disconnect whatever device is connected to the peltier in order to take voltage and temp readings. I can load the temp probe on top of the terminal leads but is there a way to set this up so the peltier stays loaded while I switch between readings?
SSGrower
Average Grower
food sucked, beer was cold.I think you'll get by with 250v.
Can't say I've seen a yard house before. Had to Google it before posting. Not a big chain food kinda person but I'd give it a try!
ChiefRunningPhist
Drunk on Knowledge
I'm not exactly sure why the fan is consuming less. It could be current limited internally? It seems it needs a 5v source, but with the Peltier generating 0.5w with the LED, if the fan could handle 0.5w @ 5v then it should be pulling 100mA. I guess the internal resistance is such that it can't flow any more current at the 5v. But idk why??Those were with the head unit of an led flashlight.
These are with the pwm fan as th load.
View attachment 5975
View attachment 5976
Notice the wattage is half what it is for the leds. Why?
I have to disconnect whatever device is connected to the peltier in order to take voltage and temp readings. I can load the temp probe on top of the terminal leads but is there a way to set this up so the peltier stays loaded while I switch between readings?
Last edited:
Erick31876
Solo cup champion 2019
What is a peltier? I never heard of that beforeThis seems like it will work but apparently the 10A side of my multimeter is blown so when I kept switching back and forth between the 400ma and 10A trying to figure why I'm not getting a reading, I blew the 400ma side. Fuck me.
View attachment 5941
View attachment 5943
View attachment 5944
That is a COB on a peltier at 50 watts it was running 2.6V @337mA at 60 watts I blew the multimeter.
SSGrower
Average Grower
A peltier is a device that either creates a temperature differential when an electrical current is applied or creàtes an electric current when there is a temperature difference. It is called the seebeck effect.What is a peltier? I never heard of that before
One common use for them is in beer brewing, they are used to quickly chill the wort mixture.
I am using the heat created by the COB as the hot side the heatsink is the cool side and the current will power some uv leds.
SSGrower
Average Grower
For reasons I cannot explain the peltier shit the bed today.
The epoxy did not look burnt, but cob temps continued to rise and electrical output eventally dropped below what would light the flashlight led.
IDK if this was caused when I blew the meter a couple days ago or if it was an inevitable failure. I need an easier way to more accurately test these things. Had to invent a tool to remove the cob from the peltier.
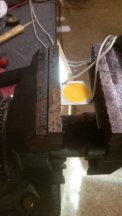
 In case you are wondering cree COB chips are more durable than cheap Chinese peltiers. DON'T CLOSE IT ON YOUR FINGER! (or any other body part).
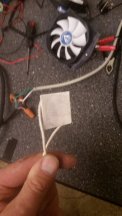
No burt diodes, just need to clean up the back with a whet stone or good file.
SSGrower
Average Grower
I dont think so because the continuity being made by meter whIle taking current reading would be inturruptef by the short created to read voltage if using the same meter.Would installing a bypass set of jumper leads work to do what your trying? Keeping it loaded while you do your readings? Or a separate set of sensors so it's always reading both?
IDK the principles well enough tho to say for sure.
I think I can do it how it id now if I know the impedance or reverse voltage (I don't even know what the right term is) of the device being powered. That is how I estimated the fan required a minimum of 2 volts to run.
I need help with the electrical theory here, both with setting up the meter and why the peltier is behaving the way it is.
SSGrower
Average Grower
Yeah, a second meter would do it for sure, hell can get a discount on a 4 pack cause I besides temp I should be looking at the DC side of the driver too. I need one or four of those neat monitors you see pepole putting on their builds.I'm not familiar with the usage of a Peltier, I get the theory, and the working concept, but not sure how I'd go about testing on or with it. I'd have to dick with it and see. Lol.
Could you just use two meters then?
I can set you up with a couple if you want mess around.