HLG QB132 V2 and LRS-350-36 DIY Build

MtRainDog

Blümen Meister
Can the V1’s and V2’s be used on the same driver?
I'm pretty sure you can, as long as you wire them in series. In series, each component can draw different voltages, so long as the sum of the voltages is less than what the driver is rated for.

This was an excellent write-up that covers the topic in depth, and is easy to digest:
 

Opie1

Master Grower
People ask questions for fucking weeks on end. Make up your mind ffs. How many opinions do people need only to go with something from left field at the last second, anyway.
Already made up my mind. On a different build. Had extra parts.
I won’t ask you anything else.
 

Big Perm

Budtender
haha, no problem man. It's just kev and these people ask and ask and ask the same question over and over. Days later they are still asking the same question.
 

Big Perm

Budtender
Has kev even picked out his stuff yet, damn
That was aimed at him, I thought it was his tent and light thread still running away.
 

MtRainDog

Blümen Meister
Good job so far with this! Wished id of had this info b4 i built mine. Alot of searching b4 i jumped into building mine. I had everything u have except for the wagos and i didnt jumper the ground wire on ur cord like u did. I ran wires from driver to each board. But nice job so far dude u will love em
Thanks @Big Terps! I'm excited to finally be maxing out the light for my space, not sure I'll ever be able to grow out those 9lb hammers like you did, but at least I know what's possible now! (Can't blame not having enough light for my shitty grows now :ROFLMAO:)

And good point, you're absolutely right, you can skip the wagos and wire directly to the driver. Since it has 3 posts for V- and 3 posts for V+, there's plenty of space to wire the boards directly to the driver.

The only reason I picked up the wagos is in case I want to move the driver outside the tent. Seems like it would be really easy to just quick-disconnect from the wago, and run longer wires to the remote driver.
 

MtRainDog

Blümen Meister
The Frame

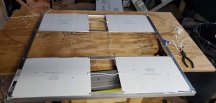
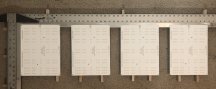
Here's the basic layout for the four boards. This diagram is drawn to scale. I wanted an even spacing around the boards within the tent. This means there is 2.5" between the boards and on the very ends between the board and the tent.

qb132-4x2-dimensions.png

The aluminum angle brackets are kind of pricey, so I need to be sure to measure accurately, and avoid more trips back to Lowes to spend more money because I screwed up a measurement or cut.

frame.jpeg

So with a 4' length and an 8' length, I needed 6 pieces cut. 2-long pieces for the sides that the boards attach to. 2 pieces for the very ends of the fixture. And 2 pieces that hold the driver in place. Here are their measurements:

2 x 44 5/8" (the long sides)
2 x 12 5/8" (the end pieces)
2 x 12 3/8" (the driver rails)

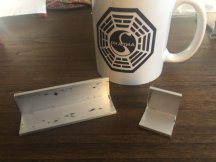
Luckily, I measured and cut correctly. Here's all that was left from those two pieces after all my cuts were made:
pieces.jpeg

Cutting the Frame

Honestly I was nervous about this part since I had no real experience cutting metal like this. Fortunately, using a miter saw with a standard carbide blade worked perfectly. These angle brackets are only 1/8" thick, no trouble at all for a miter saw. I imagine a table saw would work just as well. You could use a hacksaw, but that's a lot of work and would probably turn out kind of rough looking.

Safety First!

If you use a powered saw like a miter or table saw for this, please wear eye protection. It definitely will shoot little metal shards out!

Putting the Frame Together

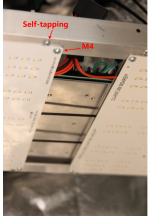
For this part, I used a 7/64" drill bit to create pilot holes for the self-tapping screws. My cordless drill couldn't hold the bits in place to get through the aluminum well. So I switched to a corded drill with a locking chuck, this worked much better.

You want to drill through both pieces in the 4 corners, and then thread your self-tapping screws through from the bottom of the fixture. Use a normal Phillips screwdriver for this to avoid stripping the heads of the screws.

At this point, if you decide to mount your driver to the fixture, go ahead an attach the 2 rails where you want them using the same method as putting the frame corners together (create pilot holes, and use the self-tapping screw).

Attaching the Boards

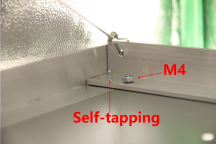
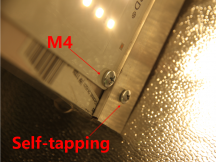
The boards were placed so that the edge of the board was 1/2" away from the edge of the frame. This placed the boards holes pretty damn near center of the angle brackets. I used the 1" angle bracket, but plenty of others have used 3/4" brackets. Either will work fine. My Lowes only had the 1" stuff in stock. Also, definitely go with 1/8" thick brackets, the 1/16" stuff seems flimsy in comparison.

For this, I used the 5/32" drill bit to create holes for the M4 screws. I suggest getting a pack of short (like 1/2" long) and pack of longer (maybe 3/4" - 1" long) M4 screws. Luckily I had some longer ones on hand. I needed the longer ones for mounting the boards near the driver rails (the screws needed to go through both the frame and the driver rail in that spot, you can see it in one of my previous pictures).

Again, the screw should go through from the bottom up, and then secured with an M4 nut.

(Notice the longer M4 screws that had to go through both the frame and the rail):
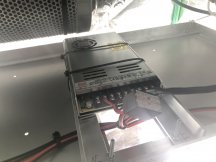
driver4.jpeg
 
Last edited:

MtRainDog

Blümen Meister
I ordered. Finally starting to understand some stuff almost lol 12 pages later. All the parts should be here Tuesday - thursday. Thanks for your help sorry I ran you through the gauntlet
Ha, you get a free pass around here with that Welchie pic! I didn't know Eso used that as his product pic until I visited his updated website a couple days ago, which btw looks amazing. Your Welchie looks like absolute fire to me, congrats!
 

MtRainDog

Blümen Meister
Pictures!!!

Top-side of the frame corner
screws1.png

Bottom-side of the frame corner
screws2.png

Top view
IMG_5983.JPG

Shot of the fan keeping things cool. It really does too. I can keep my hand on the back of the boards or the driver without it feeling too warm. Everything feels like it's about 120-130 degrees F (I used to work at Sbux and I can gauge temp with my bare hands pretty well! I know exactly what 140 degree metal feels like, and that's not very hot. These are cooler than that)
IMG_5985.JPG

Lights out bottom view
IMG_5986.JPG

Driver mounted between two boards. Note there isn't much space here. I actually mounted the boards first before I drilled the pilot holes for the driver rails. If you do it this way, just measure carefully and take your time.
screws2.png

My janky ass plants LOL. At least they have plenty of light now! This is what happens when you don't plan things well, and you end up with plants at all different stages. Hope the big ol' OGKZ there doesn't get too big... that's a 3.5 month veg time (don't ask me why)
IMG_5989.JPG
 
Last edited:

Buddha61

Really Active Member
I used this combo for my flower tent. I had some V1 boards, 3500K, powered by a HLG-240H-C1750B, which would go up to ~240 watts, but now I am able to make full use of the 75w per board if I like. I currently am running them ~270w, and with no direct airflow on them (tent in fan for movement, exhaust for circulation), and the backs of the boards run between 100-110°F usually. I can double check later when the lights come on and have been on for a bit. The pics are from the new frame, but with the old driver. They are now run in parallel with the LRS350-36. I had 2 grows with the HLG/QB132 combo, and got 8oz nice, 4 oz larf from my first grow, a scrog, learned the value in start defoliation. 2nd grow had 2 plants (2 were males, subbed with autos, but counting the photos), mainlined/manifolded, and each grew ~4oz of nice smoke, so 4 of them could be ~1lb. Now we will find out in a grow or two if the extra watts adds anything, but I am a fan of the boards for sure. I have a desire to build more, and nothing to use them for lol

20200429_162952.jpg20200429_200518.jpg

I have also built a QB132 light for my veg tent, though it is getting less power (HLG-185H-C1400B ~195w)

20200304_173604.jpg20200521_152941.jpg
 

Big Terps

Growing on a dime
Ya dude nice builds! When i had my qb132s and was running them wide open at 75w each board, theyd stay right at 100-110 degrees with small fan blowing on them. Same with driver. Ran very cool.

8 qb132s in 6x8 room wood only raise room temps maybe like 8-10 degrees.
I had those 8 qb132s and a mars ts1000 in a 6x8x7. Totaling like 750 watts. Plenty of light imo for that space.

Im still debating on if i shud buy 3500k or 4000k to use as a full grow light.
Im thinkn il go with 4000k to veg n flower.
The added blues will help stretch getting crazy, plus itll help give the glitter a xtra boost.
But regardless of which kelvin i go with, the only and best driver to go with for them qb132s is that lrs-350-36.
Just like the qb120's. If id buy them id def use the lrs-350-24 for them..
Just my opinions and wanted to say nice builds and good choice to go with those qb132s. Lots of people underestimate those boards.
Nice job dude!✌
 
Top