
jpcyan
Really Active Member
This was one of my first attempts at a shallow bubble clone machine. I have built and tried many versions since.
This a very simple, low cost, yet extremely effective bubble cloner. It uses a minimal amount of parts and is quite easy to build. Feel free to add suggestions or make modifications to suit your needs.
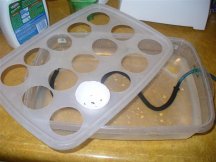
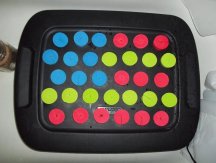
This model is made from a Rubbermaid take-a-long. It is a rectangle with lid and holds 1 gallon.
The basic setup consists of :
I used a cup with a slightly larger base to trace the circles which will be cut out of the lid to hold the bottoms of the styrofoam cups. Only the bottom inch or so of the cup will be used. The cups taper will hold it in place in the lid.
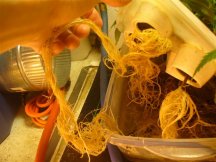
Carefully cut the lid. The material is somewhat soft and does not crack or split as easily as most lids/tubs. After you cut the first hole, test fit a cup into it to make sure it is the correct size.Once you know it will work, finish cutting the lid, and begin cutting the bottoms of the cups. Only the bottom 1-1/12 inch is needed. Poke a small hole near the center of the cups. The cup can easily be removed from the rooted cuttings later by cutting or breaking the foam loose. The hole should be just a bit larger than the diameter of the stems. (I ended up removing all but an 1/8" around the bottom of the cups. I found square open cell foam made for sealing a window a/c unit and cut to fit snugly with a split to insert cuttings.)
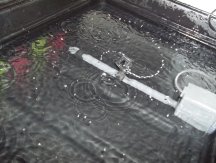
Now poke, drill, or melt a small hole, just a lil smaller than the diameter of the airline tubing in on end of the tray. Just below the lip of the tray. You want the hole smaller than the tubing to hold it in place securely and keep water from bubbling/spilling out around tube. Insert a few inches of the tube into hole and attach the flexible bubble wand to the airline tubing.
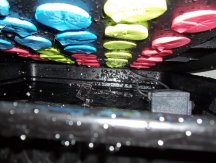
Now hookup aquarium pump, add water and nutes if desired to about 1/2 to 3/4 full in tray. Put your lid on and insert cups and foam.
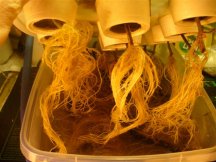
Add your favorite cuttings and you'll have roots in a flash. This was at 2+weeks. I've had roots at day 3 when conditions were just right.
I have a few more I'll post later.
This a very simple, low cost, yet extremely effective bubble cloner. It uses a minimal amount of parts and is quite easy to build. Feel free to add suggestions or make modifications to suit your needs.
This model is made from a Rubbermaid take-a-long. It is a rectangle with lid and holds 1 gallon.
The basic setup consists of :
- 1 Rubbermaid rectangle take along 1-gallon
- 15- 10 oz styrofoam cups
- exacto knife or sharp razor blade
- aquarium pump (preferably new)
- aquarium airline tubing
- flexible bubble wand (18inch or larger)
I used a cup with a slightly larger base to trace the circles which will be cut out of the lid to hold the bottoms of the styrofoam cups. Only the bottom inch or so of the cup will be used. The cups taper will hold it in place in the lid.
Carefully cut the lid. The material is somewhat soft and does not crack or split as easily as most lids/tubs. After you cut the first hole, test fit a cup into it to make sure it is the correct size.Once you know it will work, finish cutting the lid, and begin cutting the bottoms of the cups. Only the bottom 1-1/12 inch is needed. Poke a small hole near the center of the cups. The cup can easily be removed from the rooted cuttings later by cutting or breaking the foam loose. The hole should be just a bit larger than the diameter of the stems. (I ended up removing all but an 1/8" around the bottom of the cups. I found square open cell foam made for sealing a window a/c unit and cut to fit snugly with a split to insert cuttings.)
Now poke, drill, or melt a small hole, just a lil smaller than the diameter of the airline tubing in on end of the tray. Just below the lip of the tray. You want the hole smaller than the tubing to hold it in place securely and keep water from bubbling/spilling out around tube. Insert a few inches of the tube into hole and attach the flexible bubble wand to the airline tubing.
Now hookup aquarium pump, add water and nutes if desired to about 1/2 to 3/4 full in tray. Put your lid on and insert cups and foam.
Add your favorite cuttings and you'll have roots in a flash. This was at 2+weeks. I've had roots at day 3 when conditions were just right.
I have a few more I'll post later.
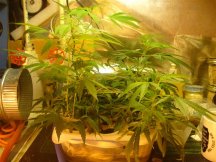
") Just a couple 13W cool CFL's over the top.
Just a couple 13W cool CFL's over the top.